Posters That Profit: Creating attractive and effective event posters
Step 1: Gather all the information
Get all the details about the event or project that people will need to know like the date, time, and location. If tickets are sold, you’ll need to list the ticket price and where/how people can buy tickets. You will also need to know any special information about the event or project that will have an effect on who can participate (such as age requirements) or legal info that must be displayed (like a lottery license number)
It’s also important to know what’s going to happen at the project/event and who you want to participate. These facts are really important since they’ll help you in the next steps of making your event poster.
Step 2: Create your brand
A brand is a name, term, design, symbol or feature that sets your event apart from another. It’s like making a package for your event or project to create a good first impression. In essence, you’re dressing up your event or project to attract a certain type or types of person. You could make a catchy name, design an event logo or invent a hashtag. Or, you could do all three of those things. Different people notice different things so having more than one element of interest means that you will likely engage more people.
You can say a lot about your project or event with a logo. Is it fun, geared to families, upscale, hip, themed, solemn, for women? You can find ways to identify each of those things in your logo. It’s important to think about who you want to attract and what you want to say when designing a logo. This is why the info that you gathered about the event is so important – it will set the tone for what you want your brand to look like, who you want to interest and what vibe you want to project.
Let’s take a look at an event that’s put on by the Kinette Club of Assiniboia, Ladies Movie Night. It’s a fun event for women 19+, with a cocktail hour, a meal, and a movie. We have two logos for this event: logo #1 and logo #2.
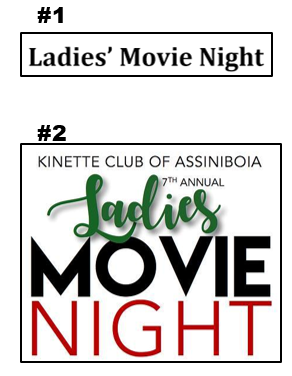
Both logos do the job of naming our event. Logo #1 tell us the event name, but there isn’t much more information that we can gather from it. Logo #2 also tells us the event name, but also is a bit more whimsical, uses modern fonts and is visually more attractive. The word “ladies” is written in a trendy script font that overlaps the rest of the words, which suggests a bit of fun.
Using hashtags is an easy way to create a quick tagline, but also track posts or mentions through social media. Hashtags are a great addition to any brand, but keep them short so they’re easy to spell and easy to remember.
Your brand will set the tone for the rest of your poster creation! This brand can carry over onto your tickets, swag bags, treats, menus, table cards and more. Plus, a successful brand can be reused, so you don’t need to reinvent the wheel every time you make a poster in subsequent years!
Step 3: Get designing
You don’t need fancy computer programs to create top-notch posters. You can do a lot in Word or Publisher (which most of us have access to), you just have to know how to use them. Layering images, shapes and/or text boxes is as hard as the technique gets.
Once again, we will use the Assiniboia Kinettes’ Ladies Movie Night again as an example. The Assiniboia Kinettes were showing Bad Moms Christmas. After doing a bit of searching online, the movie had a tagline of “Party like a mother”, which was perfect for this event. There were also images available online of the movie’s characters partying with Santa, once again perfect for this event. (Just as a note, using images can be a slippery slope since many of them are copyrighted. If you use the image without permission, the owner of the image may ask you to cease and desist from using it, at which time you would need to remove it from your poster. So when possible, use an image that you have taken, designed or own outright otherwise you run the risk of having to remove that image from your marketing materials.)
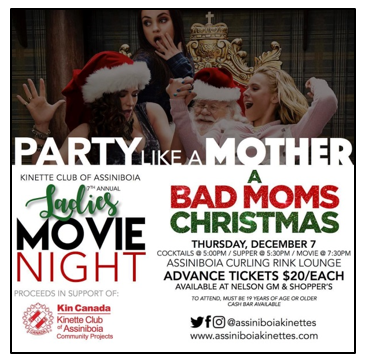
To begin this poster, a black rectangle was placed on the page as tall and as wide as the page. The image of the characters found online was pasted overtop and the transparency of the image was reduced to 50% so that the black rectangle underneath showed through, making the characters’ pic darker. Next, a big white square was pasted over the darkened image to crop it to the right size. A text box was added with a see-through background, no border and white text over top of the remaining image with the phrase “Party like a mother”.
Add in the event logo, the event details, include our club logo and contact information in the white space. Voila! The event poster is designed, just like that.
As a quick tip to layer your images, shapes and text boxes, use the formatting tools to be able to move your object around easily, change the colour or make it transparent. You can also play around with different border effects, alignments and rotations.
The secret to placing objects in Word is to remove their anchors to a specific position. To do that, click on the image, select the “Format” tab for the object, then click on "Wrap Text" then select "In front of text". In essence, this is what can make Word work like expensive design programs!

Step 4: Print, post and share
Now that it’s created, you need to put that poster to work! Print it as a PDF or save it as a JPG to print, email or post online.
Print a few posters to hang in key locations around town frequented by the people you want to attract. If you’re trying to attract families, put your posters at the library, grocery store and daycare. If it’s for ladies, hang up your posters at shops, banks and grocery stores.
A club website is a great spot to post information and create an event web page that can be found through Google. Use your poster on your website to provide your event details.
Social media is a powerful tool and an image of your poster on social media is powerful too. You can post for free on Twitter, Instagram or Facebook, and your club members can share the heck out of it. The page administrator is able to see how many people saw the image and how many times it was shared. If you really want to reach a lot of people in a short amount of time or if you aren’t getting the results you want, you can pay to have your post sponsored. You can choose who will see it, how much you want to spend and how long you want people to see it.
Don’t forget to use your hashtags, including #kincanada in all your social media posts.
There you have it. It really is pretty simple to create a great poster that provides information and garners interest in your event. No super-tools required – all you need is some creative thought and a computer. Like anything, the more you practice the better you’ll become, so play around with different ideas and methods. If it appeals to you, chances are it will appeal to others too! #beUnstoppable #volunteersrock #postersthatprofit
About the Author:
Lisa Martin, Kinette Club of Assiniboia
I currently do some freelance graphic design work and photography in Assiniboia, although my current full-time position is as a mom. Through my last 2 employment positions, in both the real estate and manufacturing sectors, I learned a ton about marketing and design from some really amazing people, even spearheading the rebranding of an international company. I’ve always been a creative type and my hobbies include photography and painting. I joined the Kinette Club of Assiniboia in 2014 and am currently serving as the Past-President and Treasurer. I still occasionally fill in as PR Director when needed, as the position I’d held from 2015-2018. Check out the #amazingAssiniboia Kinettes’ Facebook, Instagram or Twitter pages for my Kin poster portfolio!
No comments
No comments have been posted yet.